Transform Your Cluttered Garage Into A High Performance Workshop
Garage renovation is the process of transforming a neglected storage space into a functional, organized area that adds real value to your home. It works by clearing out clutter, repairing walls and floors, and installing smarter storage like cabinets, shelving, or pegboards. The big benefit is you gain a versatile multipurpose room for hobbies, a home gym, or even a workshop—all without moving walls. To use it, simply plan your layout, choose durable materials, and tackle one zone at a time to keep the project manageable.
Deciding What Your Garage Space Actually Needs
Before you order new flooring or shelves, you need to decide what your garage space actually needs. Start by listing the activities you’ll do there most—is it parking, woodworking, or just storage? Your primary function dictates the layout, so prioritize zones for that core use. Measure your car’s dimensions and walking paths; you’ll want clear room to open doors without feeling cramped. Then, audit every item you plan to keep—this prevents buying storage that still leaves clutter. It’s tempting to overbuild, but you can always add later if your needs shift. Stick to a flexible plan for now.
Assessing current damage, storage issues, and wasted square footage

Begin your garage renovation by meticulously documenting damage and inefficiencies. Note cracks in the slab, water stains on walls, or rusted shelving that compromises safety. Evaluate every storage system: are bins stacked to the ceiling, creating an avalanche risk, or are tools scattered across workbenches? Measure wasted square footage—the six-foot gap where a single box sits, or the corner occupied by a broken bicycle. This audit reveals if you need vertical storage rather than more floor space.
- Photograph all cracks, leaks, and structural issues for repair priority.
- Count items stored on the floor versus on walls or ceiling.
- Map unused wall length and overhead volume for potential shelving or racks.
- Identify zones where double-stacked bins block access to frequently used gear.
Matching the upgrade to your primary use: workshop, parking, or gym
Before renovating, match your garage upgrade to your primary use to avoid wasted cost. For a workshop, prioritize heavy-duty flooring, ample electrical outlets, and bench-deep storage; insulation is critical for year-round comfort. For parking, focus on widened doors, durable epoxy flooring to resist oil drips, and built-in shelving for seasonal gear. For a gym, invest in rubber matting for joint protection, dedicated HVAC for temperature control, and wall-mounted mirrors or storage. A multi-use space often requires zoning, such as segmented lighting for distinct work and exercise areas.
| Primary Use | Core Upgrade | Key Feature |
|---|---|---|
| Workshop | Heavy-duty flooring | Abundant outlets & insulation |
| Parking | Durable epoxy floor | Wider door & drip resistance |
| Gym | Rubber matting | HVAC for temperature control |
Breaking Down the Core Components of a Full Makeover
A full garage makeover begins with stripping the shell: clear all contents, patch cracks in the floor and walls, and apply a durable epoxy coating. Next, install modular slatwall panels or heavy-duty shelving to organize tools and gear vertically, reclaiming floor space. Upgrade lighting to bright LED panels, and insulate the garage door for climate control. The core sequence—cleanse, coat, organize, illuminate—turns a dumping ground into a functional workshop. Q: What is the first component of a garage makeover? A: Clearing and repairing the structural shell, including sealing the concrete floor with epoxy, which sets a clean foundation for all subsequent upgrades.
Flooring options: epoxy coatings versus polyaspartic versus interlocking tiles
For garage flooring, the choice between epoxy, polyaspartic, and interlocking tiles hinges on durability and installation. Epoxy coatings offer a hard, glossy finish but require meticulous surface preparation and a multi-day cure, making them prone to peeling if moisture is present. Polyaspartic is a faster-curing, UV-stable alternative that handles temperature swings without yellowing, though it is more expensive. Interlocking tiles provide a waterproof, instant-use surface that hides concrete flaws and simplifies repairs by replacing individual squares. The decision between epoxy and polyaspartic often comes down to cure time versus budget, while tiles win for DIY flexibility and immediate foot traffic.
| Aspect | Epoxy Coating | Polyaspartic Coating | Interlocking Tiles |
|---|---|---|---|
| Installation time | 2–3 days to cure | 24 hours to walk on | Same day, no glue |
| UV stability | Prone to yellowing | UV stable, no fading | Varies by material |
| Repair method | Strip and recoat | Strip and recoat | Replace single tile |
| Moisture tolerance | Low (requires vapor barrier) | Moderate | High (vents under tile) |
Wall treatments and insulation choices for temperature control and durability
Insulating garage walls with rigid foam or fiberglass batts creates a critical thermal barrier for effective temperature control and durability. A vapor barrier should be installed on the interior side to prevent moisture infiltration, which compromises insulation performance and causes rot. For wall treatments, impact-resistant drywall or oriented strand board provides durable surfaces that withstand garage activity. Sealing all seams with acoustical caulk further blocks air leaks, maintaining consistent temperatures and reducing energy loss.

- Use rigid foam insulation with taped seams to maximize R-value and block thermal bridging.
- Install 5/8-inch fire-rated drywall for enhanced impact resistance and safety.
- Apply a vapor-retarding primer to painted wall treatments to prevent moisture damage.
- Add a weatherproof backing board behind workbench areas for added durability.
Maximizing Storage Without Cluttering the Floor
In a garage renovation, the goal is to reclaim square footage by shifting weight from the slab to the walls and ceiling. Install heavy-duty wall-mounted racks for bulky bins and gear, keeping them elevated and accessible. Use slatwall panels or pegboards to hang tools vertically, eliminating bulky workbenches that squat on the floor. Overhead ceiling tracks or pulley systems are ideal for stowing kayaks, ladders, or seasonal tires completely out of the way. A frequent question is: “How do I store 40 bins without a single one touching the ground?” The answer is a staggered wall-grid system, where each shelf cantilevers off a reinforced rail, leaving the concrete floor clean for your vehicle to park.
Slatwall systems versus overhead racks versus modular cabinets
Slatwall systems, overhead racks, and modular cabinets each solve floor clutter differently. Slatwall systems versus overhead racks versus modular cabinets dictates a logical selection sequence based on item frequency. First, install overhead racks for bulky, rarely-used items like camping gear and seasonal decorations, lifting them off the floor entirely. Next, mount a slatwall system for frequently accessed tools, using hooks and shelves to keep them visible and off workbenches. Finally, add modular cabinets for closed storage of smaller, messy items such as paint and hardware, providing dust-proof containment without occupying floor space. This three-step hierarchy ensures every vertical inch is exploited before any floor area is sacrificed.
Best practices for organizing tools, seasonal gear, and sports equipment
To maximize floor space, tools should be stored on dedicated pegboards or magnetic strips mounted on walls, enabling visual access without bulky chests. Seasonal gear, such as holiday decorations or camping supplies, benefits from clear, labeled bins on high shelves to prevent floor clutter. Sports equipment requires vertical solutions: wall-mounted racks for bats and skis, plus over-door hooks for helmets and bags. A logical workflow dictates grouping items by use frequency—daily tools within arm’s reach, rarely used seasonal items overhead. Avoid horizontal piling; instead, assign each category a specific vertical zone to preserve clear floor area.
| Category | Primary Strategy | Storage Type |
|---|---|---|
| Tools | Wall-mounted access | Pegboards, magnetic strips |
| Seasonal gear | Vertical stacking | Clear bins, high shelving |
| Sports equipment | Vertical racks/hooks | Wall racks, over-door hooks |

Choosing the Right Lighting for Work and Parking
For a garage renovation, work zones require high-lumen, cool white LEDs (4000K–5000K) to reduce eye strain during detailed tasks, while parking areas benefit from warmer, softer light (2700K–3000K) to avoid harsh glare on vehicle surfaces. Mount adjustable fixtures, like linkable shop lights, above workbenches and flush-mount ceiling lights for parking. Q: Should I use daylight bulbs for parking? A: No, warm light is better as it reduces reflection and mimics standard home lighting. Position switches for work lighting near entry points and parking lights near the vehicle bay for convenience.
Lumen requirements and fixture placement to eliminate shadows
To banish shadows in your garage, you need to calculate roughly 100–150 lumens per square foot, especially over workbenches. Place your fixtures in a grid pattern, with lights spaced about four feet apart and no more than four feet from walls. This ensures overlapping beams that cancel out dark corners. For maximum coverage, install linear LED strips along both sides of the ceiling rather than a single central light, which casts harsh shadows under tools or car hoods. Angle shop lights slightly downward toward work zones, and avoid mounting fixtures directly above tall shelving that will block the light.
LED panels, linkable shop lights, or motion-sensor fixtures
For targeted brightness, linkable shop lights offer modular flexibility, letting you daisy-chain multiple fixtures to eliminate shadows across a workbench. LED panels provide a sleek, low-profile alternative for low ceilings, diffusing light evenly without glare. Motion-sensor fixtures are ideal for parking zones, automatically illuminating as you approach with tools. Strategic placement can transform a dark corner into a usable space without extra switches. Prioritize linkable systems for adaptable coverage, LED panels for flush uniformity, and motion sensors for hands-free convenience in high-traffic garage areas.
Upgrading the Garage Door for Security and Efficiency
During a garage renovation, upgrading the door for security and efficiency is a pivotal step. Installing a modern insulated steel door with a high R-value dramatically stabilizes the interior climate, lowering energy costs while providing a rigid barrier against forced entry. Pair this with a smart, rolling-code opener and a deadbolt lock to seal the weakest point of the home.
A common mistake is neglecting to reinforce the door’s bottom bracket and track mounting, as these are primary failure points during attempted break-ins.
Ultimately, this upgrade transforms the garage from a drafty vulnerability into a conditioned, secure extension of the home.
Insulated doors versus non-insulated for attached versus detached spaces

For an attached garage, an insulated door is a critical upgrade because it directly buffers shared walls from extreme temperatures, reducing energy loss into your home and stabilizing the workspace. A non-insulated door in an attached space will bleed heat in winter and radiate heat in summer, straining your HVAC system. In contrast, a detached garage has no shared climate envelope, making insulation a lower priority for energy savings; a non-insulated door suffices if you only need basic security and weather protection. However, if you use a detached garage as a workshop or gym, an insulated door remains valuable for comfort and tool protection.
| Space Type | Insulated Door Benefit | Non-Insulated Door Consequence |
|---|---|---|
| Attached Garage | Reduces heat transfer to home; lowers energy bills; quieter operation | Causes temperature swings; increases heating/cooling costs; noise passes through |
| Detached Garage (occasional use) | Minimal comfort gain; useful only if space is climatized | Acceptable for storage; no shared energy loss |
| Detached Garage (workshop/gym) | Creates stable interior temperature; protects equipment | Fails to retain heat/cooling; uncomfortable for extended use |
Smart openers, battery backups, and keypad entry benefits
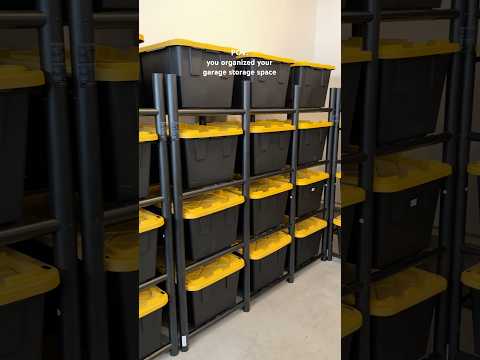
Integrating smart openers with battery backups and keypad entry transforms a garage renovation into a fortress of convenience. A smart opener lets you monitor and close the door from anywhere, eliminating the worry of leaving it open. The battery backup ensures access during a power outage, so you are never locked out. https://orgaspaces.com/ Keypad entry removes the need for fumbling with keys or remotes, granting secure, code-based access for family or service providers. This trifecta effectively future-proofs your garage against both power failures and lost keys. Q: How do these upgrades improve daily use? A: Smart openers, battery backups, and keypad entry together provide remote control, outage protection, and keyless access, making your garage more secure and effortless to operate.
Tackling the Most Common Renovation Mistakes
The biggest error in garage renovation is forgetting the floor until the end, leaving you to scrub ten years of oil stains. I learned this the hard way, installing cabinets before sealing the concrete. To avoid that chaos, always prep and coat the slab first. Most people skip the storage audit, too—they buy shelves without measuring their car’s swing radius. Q: How do I stop cramming everything? A: Map out zones with masking tape on the bare floor, parking the vehicle to test clearance before you build a single wall rack. That simple step saves you from ripping out a loft that blocks your trunk access.
Skipping proper moisture barriers and vapor retarders
Skipping proper moisture barriers and vapor retarders during garage renovation invites hidden decay. Concrete slabs naturally wick ground moisture upward; without a critical vapor barrier, this trapped humidity warps wood framing, rusts fasteners, and breeds mold behind finished walls. For attached garages, airborne moisture from wet vehicles also penetrates unsealed insulation, reducing its R-value and risking rot. Always install a 6‑mil polyethylene sheet directly over the slab before flooring, and use craft paper or a dedicated retarder on interior walls if the garage is heated. This one step prevents costly future repairs.
Q: Can I use standard paint as a moisture barrier on garage concrete?
A: No. Standard paint is permeable; you must use a dedicated epoxy or vapor-blocking sealer rated for below-grade slabs. Skipping this risks adhesion failure and moisture migration.
Underestimating electrical load for future tools or EV chargers
Failing to calculate your future electrical needs during a garage renovation is a costly blind spot. You might install just one standard outlet today, but tomorrow’s high-draw tools or an electric vehicle charger will instantly trip the circuit. This forces a messy rewire after the drywall is up. Instead, run a dedicated 100-amp subpanel and pre-run conduit for at least two 240V lines. That way, adding a welder or Level 2 charger later becomes a simple plug-in, not a demolition job.